
HOW TO BEND 3/4” PLYWOOD
A while back, we built some custom cabinetry for a dining room, which featured a central arched alcove designed to hold a wine opener. This presented a unique challenge, and I think many of you will be interested to see how we overcame it. In this post, I’ll share the lessons we learned along the way, including how to bend plywood, and a few other skills you might want to apply to a future project of your own.
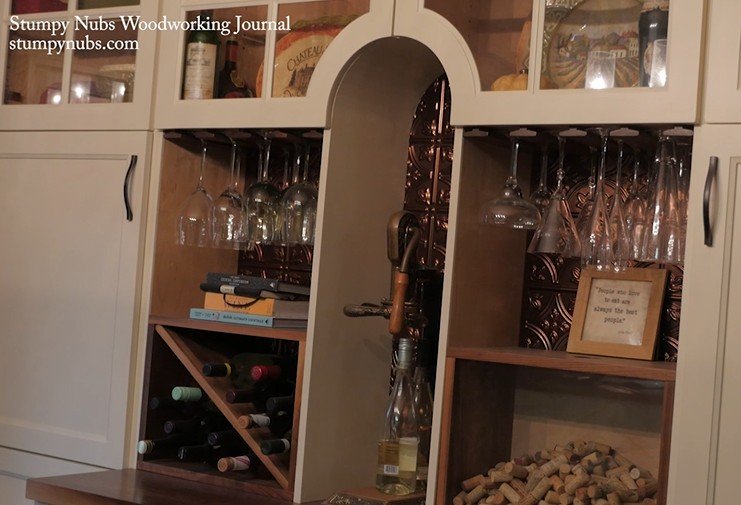
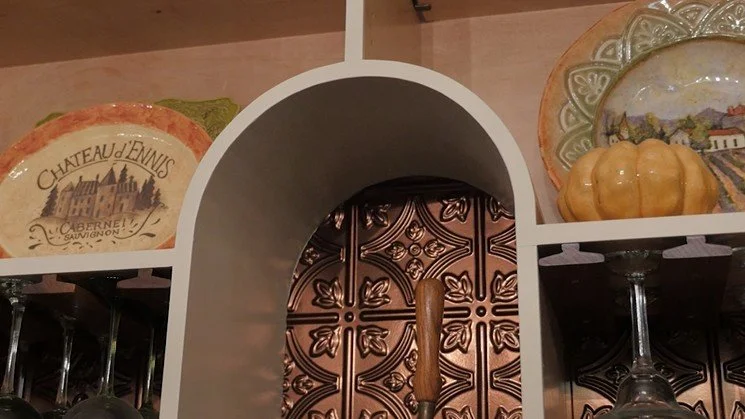
An arched alcove in custom cabinetry, created with plywood.
Setting the Scene
The archway we were working with was tall and narrow, with a pretty tight curve at the top. Initially, we experimented with bending thinner layers of plywood, which we thought we could laminate together, but it didn’t work. The curve was simply too tight.
While you can buy bendable plywood, it’s not what you might think. It’s flimsy and not suited for supporting the weight of the structure above the arch. We needed something solid.
Bendable plywood would not have worked for this project. It’s flimsy and not suited for supporting the weight of the structure above the arch.
So, we decided to try kerf-bending 3/4-inch plywood.
What is Kerf-Bending?
Kerf-bending is the practice of cutting parallel saw-kerfs partway through the board to weaken it at specific points, allowing it to bend. By spacing the kerfs just right, they will close as the wood forms the desired curve. Once glued, the kerfs close up, restoring much of the original strength of the plywood and forcing it to retain the shape.
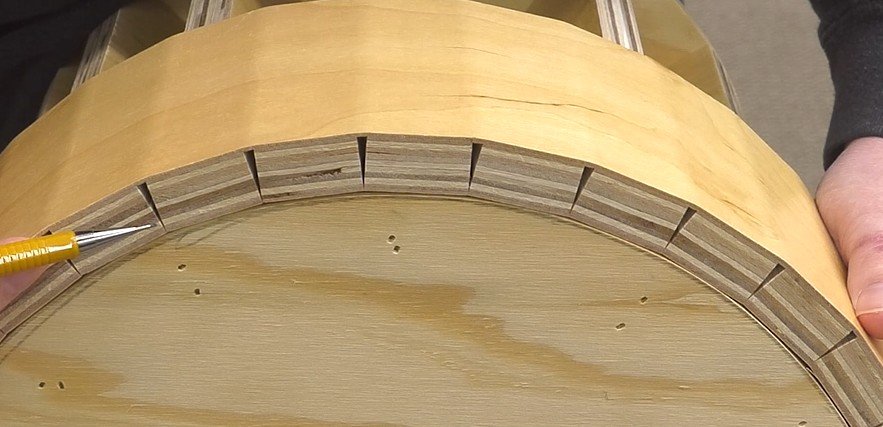
Kerf-bending is the practice of cutting parallel saw-kerfs partway through the board to weaken it at specific points, allowing it to bend.
The spacing of the kerfs is critical. If they are too far apart, the arch won’t be tight enough. If they are too close together, they won’t fully close, and the arch will lack strength.
If the kerfs are too close together, they won’t fully close, and the arch will lack strength.
Luckily, there is an online calculator that can help you figure out the correct spacing. You can find it here.
Creating the Form and Making the Cuts
Of course, we needed a simple form to bend the plywood around, holding it in the proper shape while the glue dried. This was a good opportunity to use up some plywood scraps.
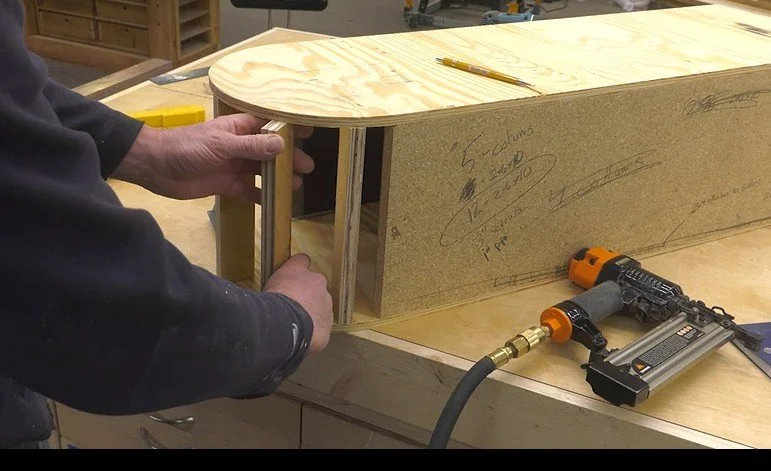
Building a form to hold the plywood curve as it dried.
Once the form was built, we carefully cut the kerfs with the proper spacing. The cuts need to be deep enough to allow the plywood to bend, but not so deep that it breaks easily. We found that leaving one ply (about an eighth of an inch) uncut worked well.
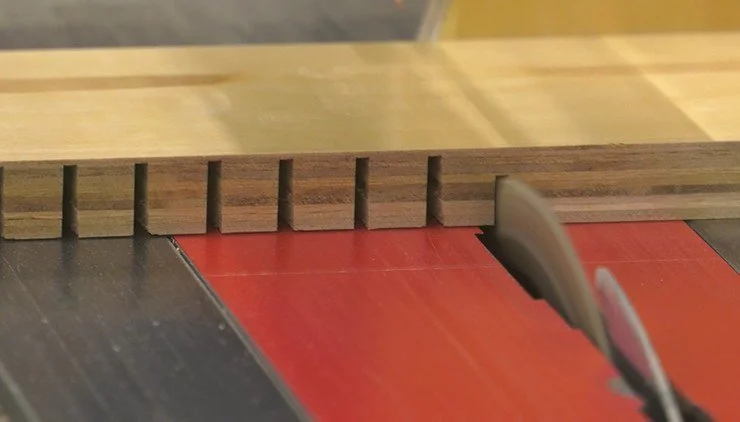
Cutting kerfs to the right depth is very important. For this project, leaving one ply of the plywood uncut worked well.
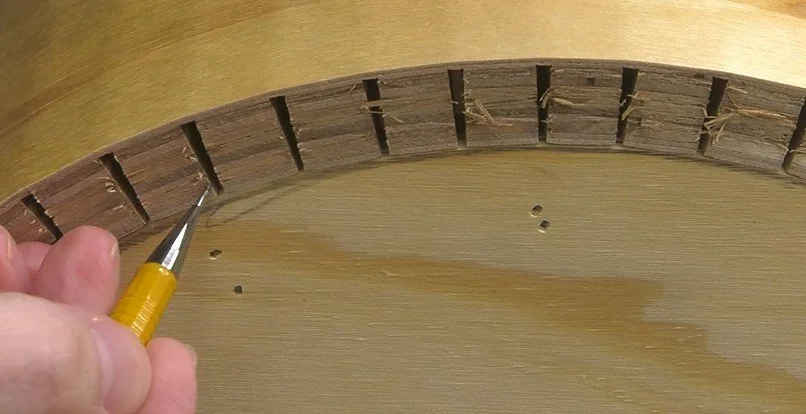
However, the board still broke because of some confusion regarding the grain direction.
The Grain Direction Dilemma
It was obvious from the start that the cuts had to be made perpendicular to the grain since wood is brittle along the grain. But plywood, of course, is made up of alternating layers with different grain directions.
We made the mistake of assuming that the remaining ply (after making the cuts) was running along the length of the board. The grain seemed to be running down the length, but there was a catch. The outer birch veneer had its grain running lengthwise, but beneath that, the grain direction of the underlying ply ran in the opposite direction.
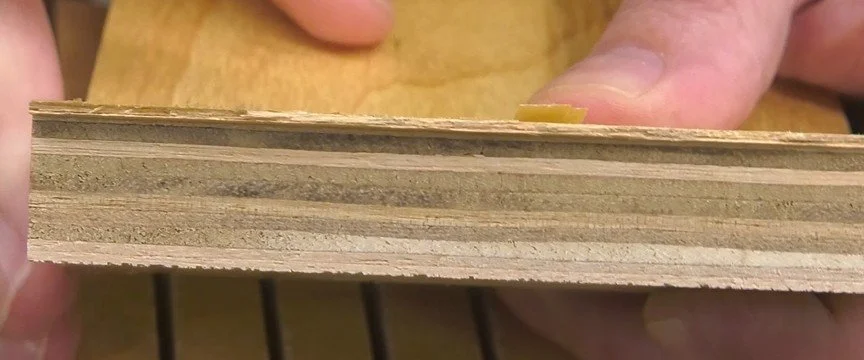
The outer birch veneer of our plywood had its grain running lengthwise, but beneath that, the grain direction of the underlying ply ran in the opposite direction.
The Key Lesson
If you're using hardwood veneered plywood, the cuts must be parallel to the grain direction of the thin outer veneer. This ensures that the cuts are perpendicular to the grain direction of the thicker ply just beneath the surface.
Once we figured this out, we applied tape to the form to prevent the glue from sticking. We filled each kerf with glue, clamped the piece to the form, and left it to dry overnight. As the glue set, the kerfs closed up, and the plywood turned back into a solid piece. While using epoxy to completely fill the kerfs would have made it even stronger, it would have been a messier process.

As the glue set, the kerfs closed up, and the plywood turned back into a fairly solid piece.
Finishing the Alcove
To complete the alcove, we cut rabbets in the side pieces and used biscuits to attach them to the bottom of the arch. This created the dados needed to connect the shelves on the sides.
Cutting rabbets created the dados needed to connect shelves to the sides of the alcove.
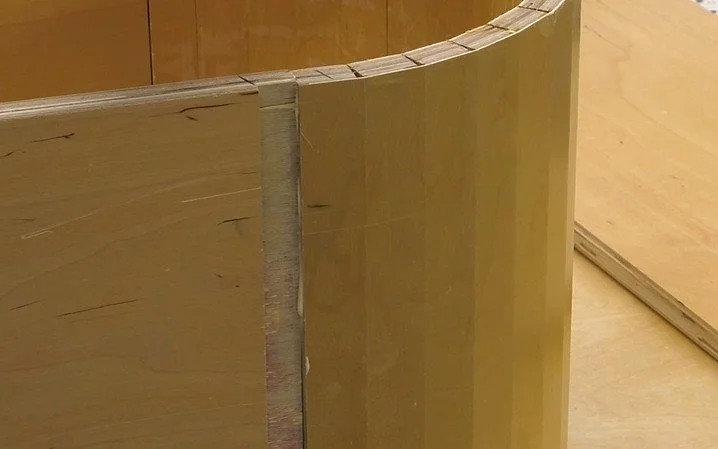
Here, you might notice one downside of this bending method: instead of a perfectly smooth curve, we ended up with a series of facets. If this had been solid wood, we could have reduced the appearance of these facets through sanding. But with plywood, sanding too much would have destroyed the birch veneer on the outside.
In this case, the top of the arch would be behind cabinet doors, so the facets wouldn’t be visible. However, the bottom of the arch was exposed and needed smoothing.
Smoothing the Curve
Fortunately, the bottom surface was going to be painted. We used body filler to smooth over the facets and leave a flawless surface. If painting hadn’t been an option, we probably would have applied a thin veneer over the body filler with contact cement to hide the facets.
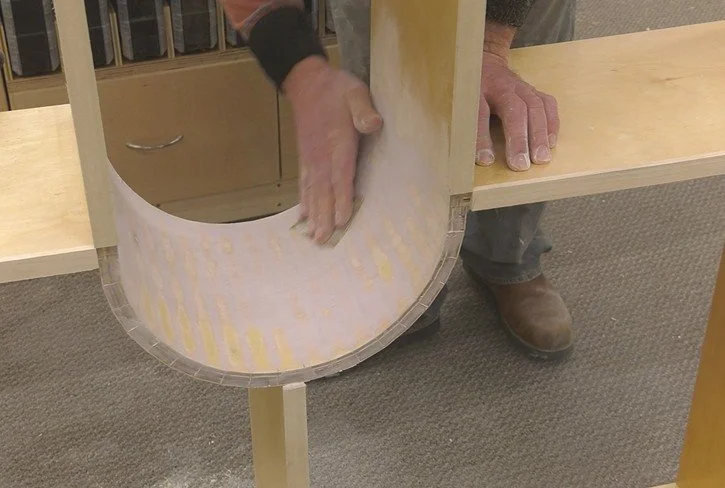
Body filler was applied and sanded to create a flawless surface on the visible inside of the alcove.
To complete the illusion, we covered the edge of the curve with hardwood banding. We glued a solid piece of wood to the edge, then trimmed it with a router bit. After sanding it smooth, the result was a beautiful, clean edge.
Conclusion
There were a lot of challenges in this built-in project, and plenty of lessons learned along the way. I hope you found this helpful, and we'll be sharing more tips and techniques in future posts. Stay tuned!
Need some cool tools for your shop? Browse my Amazon Shop for inspiration.
(This link is an affiliate link. If you make a purchase, I may receive a small commission.)