
A QUICK AND EASY WAY TO SHARPEN TOOLS
What you’re about to read is one of those forehead-smackingly good ideas which has the potential to completely change how you work.
It’s about sharpening—not just getting your tools sharp, but a way to efficiently keep them razor-sharp all the time. How great would that be? You’ll never again struggle through a job with a dull tool because you didn’t want to take the time to sharpen it.
I’m going to apply this technique to straight-edged tools like chisels and handplanes that are so essential in woodworking, but it could easily be adapted to all sorts of edged tools and even knives.
What makes this process different is how fast and effective it is. To prove it, I dulled a chisel so badly that some of you may shed a tear. Then, I restored it to a razor-sharp edge in seconds. Not minutes—seconds.
Dulling the Chisel
The edge of this particular chisel had become pretty dull because I don’t like stopping work to sharpen it. So, by the time I finally got around to sharpening it, it required a fair amount of time and effort to restore it.
Of course, you can’t see the dullness through your screen, so let me remove all doubt.

I think we can agree that this chisel is as dull as any tool you’re likely to sharpen under normal working conditions. This would take me 10-15 minutes, maybe longer, to fix with stones.
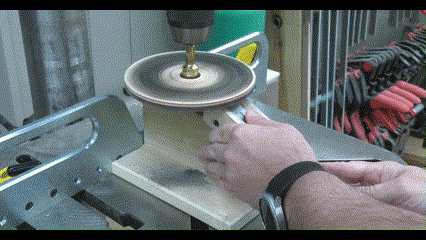
The Drill Press Method
Instead of using stones, I used my drill press and a couple of acrylic discs. These are nice and thick and have a machined arbor in the center. I have two of them—one with some 80-grit sandpaper on the bottom, and another with 220-grit sandpaper on the bottom and leather on top, charged with stropping paste.

Acrylic Disks used with the Drill Press method of sharpening
You don’t have to make these yourself; you can buy a set. They aren’t expensive, and I’ll link to them below this article.
I also used a simple wooden jig to keep my chisel aligned and at the proper angle. You can easily build this jig yourself. The plans are free, and I’ll include a link to those below as well.
The jig simply slips under the disc, and my drill press runs at the normal speed I typically use it at. I’m not sure what the exact speed is—the whole point is for this to be quick and simple, so I didn’t worry too much about it.
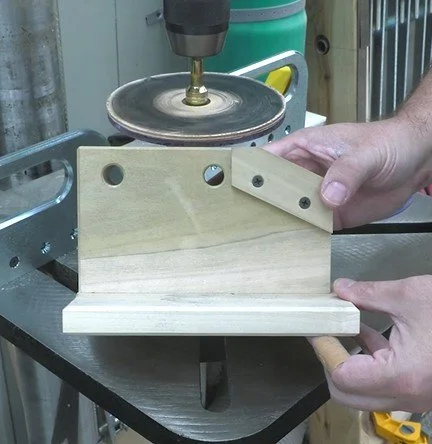
The simple wooden jig I use that keeps my chisel aligned. Get the free plans at the link below
I used a plunging motion to reduce heat, but the sandpaper on the bottom of the disc isn’t regular paper, so it doesn’t generate much heat anyway. I’ll explain more about that later in the article.
Fast, Efficient Sharpening
Refining the bevel and removing the burr
After less than 10 seconds on the 80-grit, I could feel a heavy burr on the back, telling me that my bevel is already entirely reground and repaired. I swapped discs and move on to the 220-grit to refine the bevel. I could have gone higher if I wanted to, and you might want to experiment on your own, but I spend less than 10 seconds on the 220-grit sandpaper.
Then, I remove the heavy burr on the back with the strop.
As I touch the bevel on the leather, I raise the handle just a tiny bit. This concentrates all the polishing right along the cutting edge. The speed of the disc means that in about 10 seconds, I’ve done the equivalent of 10 minutes of manual stropping.
Altogether, the whole process—from the first grit to the final strop—takes under a minute. That’s mere seconds to go from dull to sharp.
The Secret to Success: The Sandpaper
Cubitron sanding disks have precisely shaped ceramic pyramids
The key to this method isn’t just the discs or the strop, although they’re essential. What really makes this work so well is the Cubitron sandpaper discs. They aren’t regular sandpaper. Regular sandpaper is covered with randomly shaped bits of grit, like tiny pebbles. These discs are coated with tiny, precisely shaped ceramic pyramids. The pyramids shave material more efficiently, with less heat buildup, and they stay sharp much longer.
I’ve used radial sharpening systems before, and they work fine for the first chisel—if you’re careful not to overheat it. But then, you have to change the paper. With Cubitron discs, the average woodworker can keep their tools sharp all summer without needing to replace the paper.
And remember, you’re not going to be pounding on your edges with a hammer. For routine sharpening, you’ll only need one grit and the strop. This means after about 20 seconds of sharpening, you’re back to work. When it’s that quick and easy, you won’t put off sharpening, and your work will benefit from always having razor-sharp tools.
Final Thoughts
I’m not telling you to give up your stones. I’m not getting rid of mine. But if you want to try something new, or if you’re frustrated with the process you’ve been using, give this method a try. I’ll put links to everything you need below.
I want to thank Mike at Taylor Toolworks for developing this idea. It’s just another one of the reasons I like to support his family business, and I hope you’ll consider doing the same by checking out the links below.
Helpful Links (If you use one of these affiliate links, we may receive a small commission)
Complete Sharpening system (everything you need): https://lddy.no/1i3mb
Individual parts (Build your own): https://lddy.no/1i3lf
Link to free jig plans is found at the top of the product description (text section) on the sharpening kit page: https://lddy.no/1i3mb
Extra Cubitron II paper, etc: https://lddy.no/1i3lh